AI Receptionist · Setup help
From your business number to collected caller details
The receptionist answers using your business information. Caller details appear in Lead to Crew. You do not need the CRM, Make or Airtable.
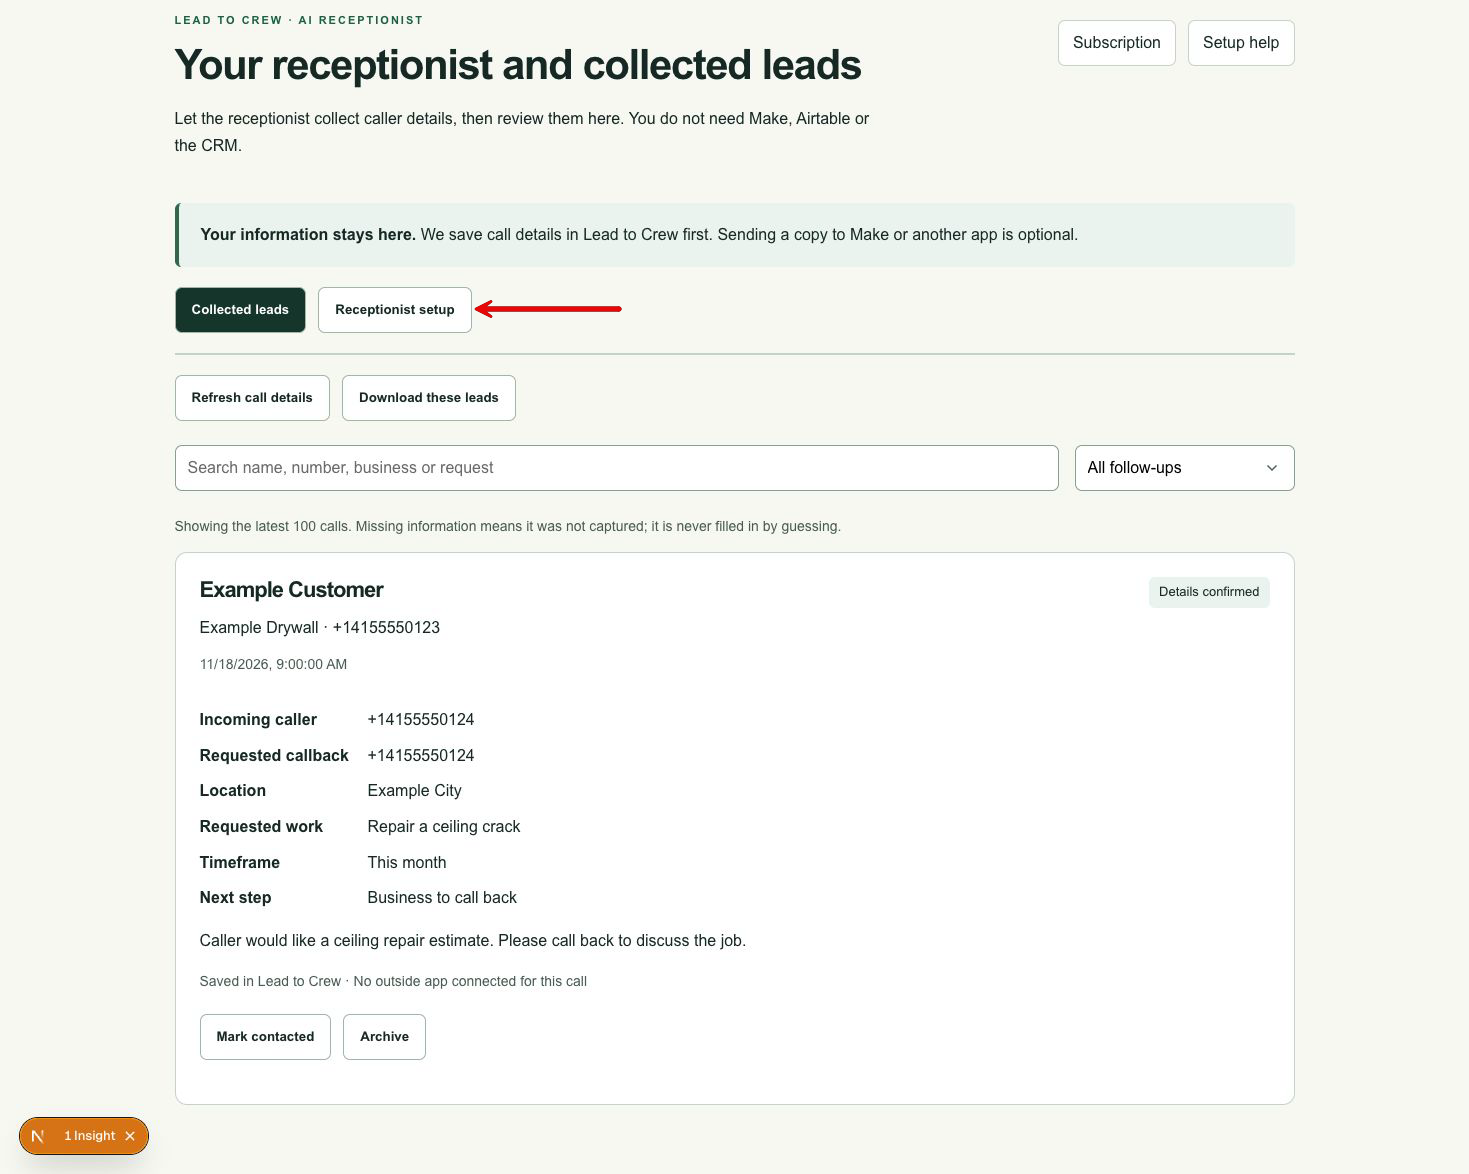
1. Connect your accounts
- Open your receptionist and select Receptionist setup.
- In Connect Twilio, leave Simple setup selected. Copy your Account SID and Auth Token from the Twilio console into the matching boxes, then connect. If Twilio is already connected, keep that connection.
- Follow the Grok API key picture guide below. Use the name Lead2Crew Receptionist and keep the key ready for the business form.
We handle the separate phone connection, call instructions and completed-call reports. You do not need to build an agent sequence or paste callback addresses into Grok yourself.
Already have a Grok agent on this number? The existing Grok phone registration must be reviewed before moving it. Use a spare number for your first test or contact support. We will not replace an existing Grok registration automatically.
What we save: your connection keys are saved on our server using encryption to protect them while stored. They let us run calls when your browser is closed. Twilio and Grok receive the call and business information needed to run the receptionist. Never paste a password or API key into business instructions.
Get your Grok API key: follow the pictures
An API key is the private connection code that lets Lead to Crew run your receptionist. Use the Grok developer console, not the regular Grok chat screen. The console may display SpaceXSI branding. Keep this guide open in another tab.
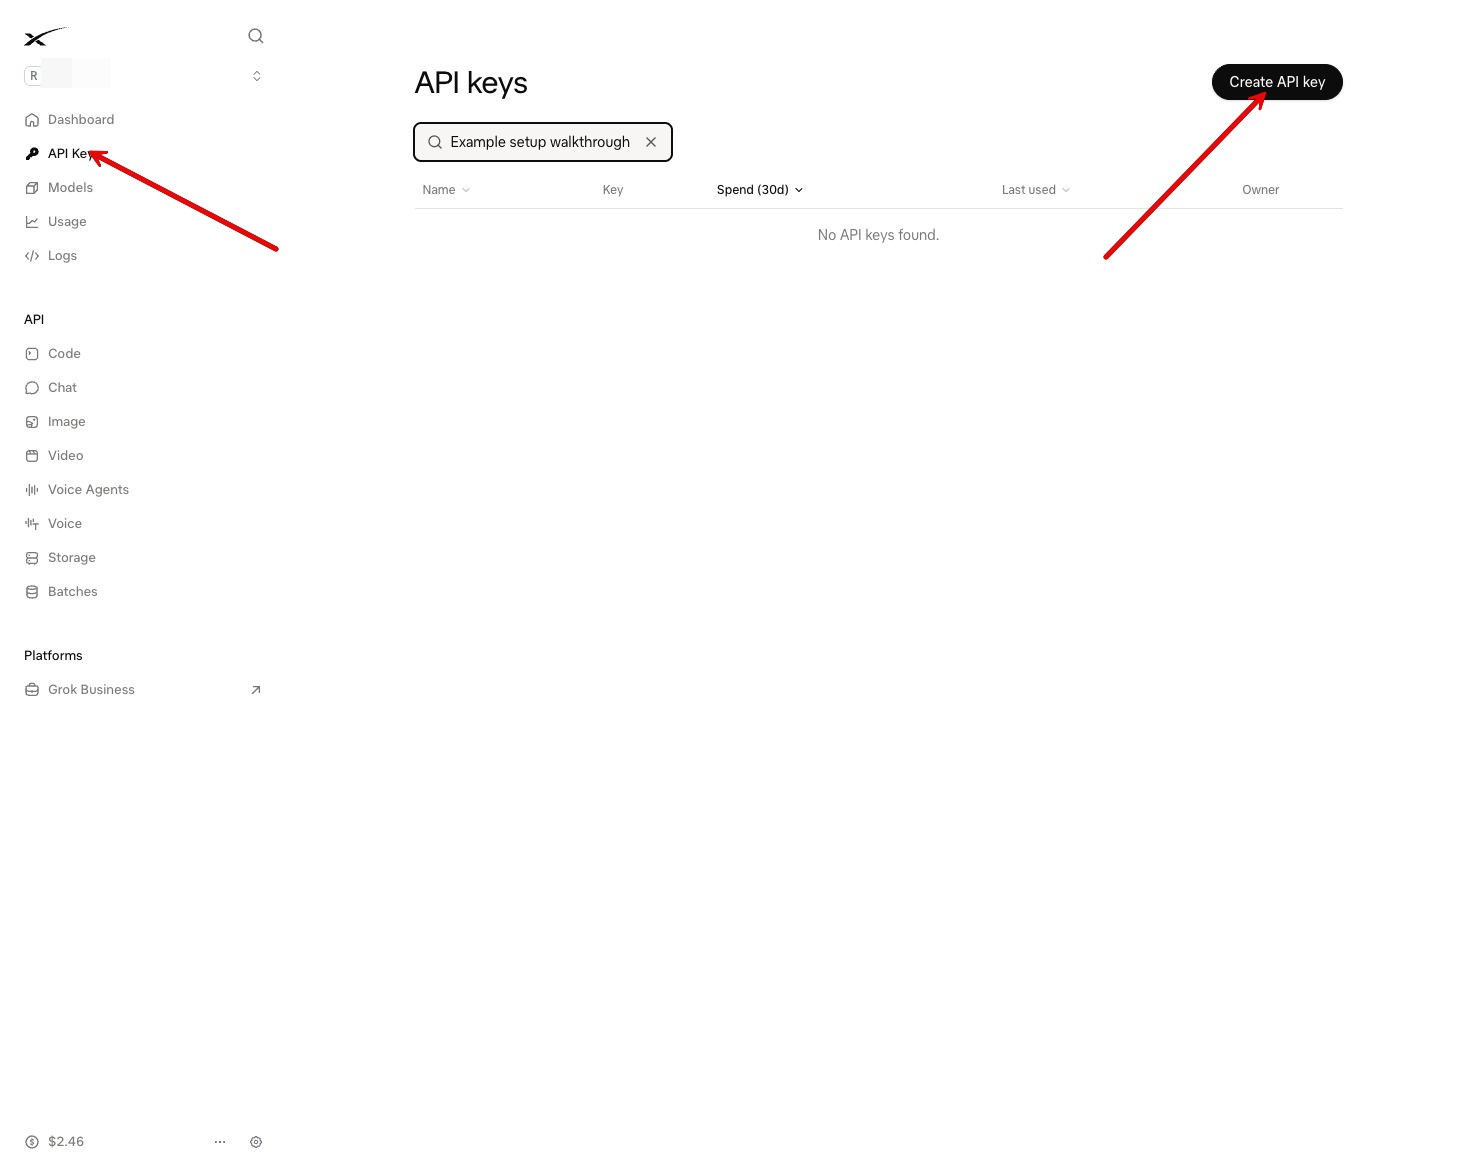
1. Sign in and open API Keys
Sign in or create your own developer account. If asked to choose a team, choose the team that will pay for this receptionist’s Grok usage. Select API Keys in the left menu, then Create API key at the top right. Your key list can look different from the example.
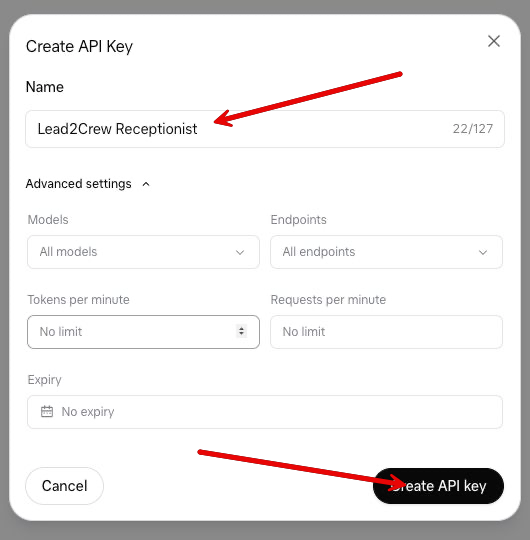
2. Name the key Lead2Crew Receptionist
In Name, type Lead2Crew Receptionist. This is a label to help you recognize the key later; it is not the secret code you will paste.
For the simple setup, leave Advanced settings at their defaults. The expanded picture shows All models, All endpoints, no custom rate limits and No expiry. You do not have to expand this section. All models/endpoints is broad access to this team’s API; keep the key private. This is the setup used for our tested connection.
3. Copy the private key Grok gives you
Select Create API key yourself. Copy the full private key from the result screen before closing it. Treat it like a password. The key name and a shortened list entry such as xai-… are not substitutes for the full key. We deliberately do not show a real secret in these pictures.
If you already have Grok connected · API key saved in Lead to Crew, skip creating another key. When adding another business, you can choose your saved Grok key. If you lost an unsaved key, create a new one; do not delete a working key without checking which services use it.
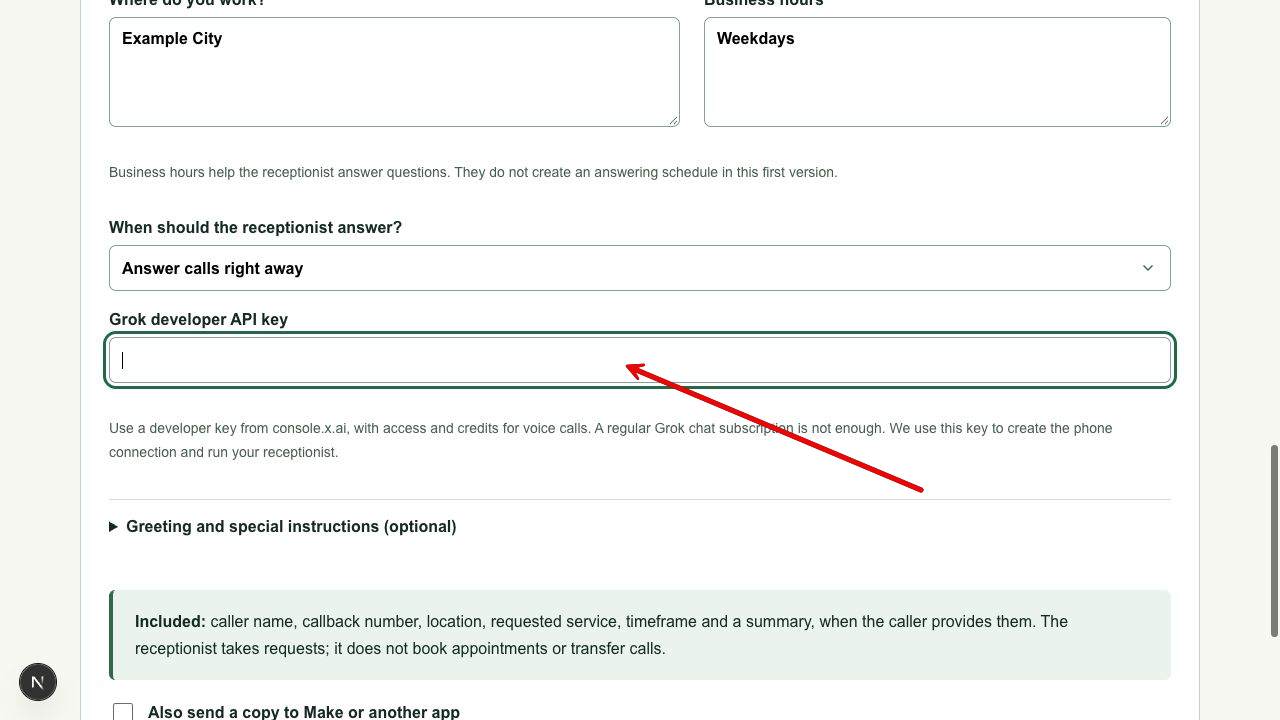
4. Paste it into your business setup
Return to Receptionist setup in Lead to Crew. Choose your number and enter the business details. Paste the full key into Grok developer API key, shown by the arrow. It stays hidden while you type. Do not paste it into the greeting, business instructions, Make webhook box or a chat message.
5. Save and check the confirmation
Finish your business details and select Save receptionist (or Save changes when editing). Wait for Grok connected · API key saved. The key is hidden after saving; an empty-looking key box does not mean you should paste it again. Saving the setup does not turn answering on. Use Turn receptionist on only when you are ready to test.
Check usage credits: the developer account needs funds for voice calls. Open the balance/billing area in Grok to review and add credits yourself. A Grok chat subscription does not pay these API charges. You do not need to enable auto top-up to follow this guide.
You do not need to build a Grok agent: Lead to Crew prepares the phone connection and instructions from your business form. Leave agent sequences, SIP settings and callback addresses to us. Screens captured November 18, 2026; labels may change. Grok’s developer voice reference.
Choose your setup path
A brand-new Twilio number
- Buy a voice-capable number in your own Twilio account and select it using Load my Twilio numbers. Buying the number is separate from connecting your account.
- Give that number a working normal Voice route before turning AI on. A new number may have an empty route. Decide where calls should go if AI is unavailable: your existing phone/voicemail flow or another working handler. Contact support if you do not have one; the current form does not build this fallback automatically.
- Complete your business and Grok setup. When you turn AI on, we save that normal route and set the incoming Voice webhook for you. You do not need to paste Grok SIP details or callback URLs yourself.
- Test the saved normal flow and AI before sharing the number with customers. Do not use Twilio’s demo greeting as a real business fallback.
An existing Rank & Rent / Make number
- Record the existing Voice URL, method, TwiML App and fallback settings before cutover. Keep the website form webhook, SMS settings, Airtable records and unrelated numbers unchanged. A spare number is the safest first test.
- Identify what the old flow does: pre-call settings lookup, phone forwarding, AI, unprocessed lead capture, final report, and SMS/email notifications. A saved old route may still invoke the old AI; choose a working non-AI fallback if an AI outage must always reach a person or voicemail.
- Move one approved business number at a time. Existing Grok SIP registrations need review; Lead to Crew will not silently replace them. If the business is already connected to an old Grok agent, contact support before activating it here.
- Lead to Crew supplies the business instructions and saves the processed lead. If you want to retain Make/Airtable, use the processed-report mapping below rather than pasting an old settings or unprocessed-lead webhook unchanged.
- Test caller routing, the linked Airtable asset/client, report storage, one notification, and rollback before migrating another number. Turning AI off restores only the selected number’s saved Voice settings.
What we configure automatically: Grok phone/SIP connection and its signed event webhook when you save; Twilio incoming Voice webhook and failure fallback when you turn answering on. A connected Twilio API key still needs permission to read/update phone routing and read/update calls for live recovery. The account needs funds and permission for any receiving-phone destination. No manual Grok agent sequence is required.
2. Add your business
- Select Load my Twilio numbers, then choose the business number customers call.
- Enter the business name, services, service area and hours. Give accurate information the receptionist can repeat.
- Choose Answer calls right away, Ring my phone first, or AI answers after hours; ring my phone when open. For phone first, enter the receiving number with country code and choose the ring time. You must answer and press 1 to take the call. If you do not answer or accept, the waiting caller goes to AI. Pressing 2 at the screening prompt also declines your side and sends the caller to AI, although the current prompt only announces press 1. This is before you connect, not a transfer after you have started talking.
- Paste the Grok developer API key, or choose your saved Grok key if you already connected another business. Add a greeting or special instructions if needed.
- Leave Also send a copy to Make or another app unchecked unless you have an existing workflow to receive the report.
- Select Save receptionist. Saving prepares the connection; it does not change incoming calls yet. You will see “Grok connected · API key saved.” We hide the saved key, and you do not need to enter it again when editing this receptionist.
The optional hours notes help answer questions. For automatic open/closed routing, choose the after-hours option and set the weekly schedule below. This first version collects requests; it does not book appointments or transfer callers. It supports up to 5 calls at once and 200 calls per account per day, with each call limited to 15 minutes. Calls above the first two limits return to your saved normal flow.
Choose a voice and listen for free
- In Receptionist setup, open your business’s Edit setup. If answering is on, turn it off first.
- Find Choose your receptionist’s voice. Compare the first five voice cards, or select Show all 28 voices to see the full list. Select Play beside each waveform to listen, then Use beside your preferred voice. The selected card shows its name and “selected.”
- Choose the voice you prefer, save your changes and turn answering back on. New calls use the saved voice; calls already underway keep their original voice.
Eve is the original default. The samples are prerecorded audio provided by Grok: playing them uses no Grok credits and makes no Twilio call. They demonstrate the voice, not your custom greeting. Phone audio can sound different.
Optional: practice a conversation by text
- Save your receptionist’s business details and Grok connection. You can leave phone answering off.
- Open Receptionist setup → Practice a conversation by text and choose the saved receptionist you want to test.
- Read the Uses your Grok credits notice and check the acknowledgement. Select Open text test. Opening it costs nothing.
- Pretend to be a customer and select Send test message · Uses Grok credits. Try a service question, a callback request, an out-of-area request or a correction. Use fictional details.
- Select End / clear text test when finished. After changing your setup, save it and open a fresh conversation.
What costs money? Each sent test message asks the Grok 4.3 text model for a reply using your saved key. Grok charges your developer account for text sent and received, including the earlier conversation sent again for context. Lead to Crew adds no test fee. This test generates no audio and makes no call, so it has no Twilio call or Grok voice charges. This is token-based text pricing, not the voice API’s per-message rate. Check Grok’s current text prices.
There is a limit of 10 sent messages per conversation and 30 test requests per account per UTC day, with short replies and one request at a time. Failed attempts count toward the daily limit and can still use Grok credits. A timeout does not prove Grok stopped processing it. We never retry automatically. These limits are not a guaranteed dollar spending cap; review your Grok billing controls yourself.
What it tests: business facts and intake instructions. This is a text simulation using a different model from live voice. It does not demonstrate the selected voice, microphone, call timing, hours routing, Make delivery or phone fallback. Follow it with a controlled real phone call before relying on the receptionist.
Your key also needs access to the Grok 4.3 text model. If the test reports a permission or credit problem, check your developer account. A text-test failure does not pause or change live phone answering. Do not repeatedly recreate the phone connection.
Practice messages are sent to Grok. We request that the response not be saved for later retrieval (store: false), and do not save the conversation in your lead inbox or send it to Make. Messages remain visible in this page until cleared or reloaded; we keep daily request counts to enforce the limit. Grok’s own data policies still apply. Avoid private customer information.
Need help deciding what your receptionist should say?
- Open Edit setup → Greeting and special instructions (optional) → Help me write these instructions.
- Select Copy prompt for ChatGPT or Claude, then paste it into the chat service you use. If copying is blocked, select and copy the prompt text manually.
- The prompt asks that service to interview you one question at a time about your business, approved answers, tone, extra intake questions and callback policies.
- Review its final answer. Paste its suggested greeting into Opening greeting and its instruction block into Anything else the receptionist should know?. That box has a 2,500-character limit. Remove anything inaccurate or unsupported.
- Update separate business facts as needed, save the setup and try a text conversation. Set voice, hours, timezone and call routing using our controls.
Copying the prompt uses no Grok credits. ChatGPT or Claude may have their own subscription or usage limits. We do not open a chat or send business information there automatically. Do not share keys, passwords or private customer records. The generated instructions cannot add appointment booking, transfers, payments or other unsupported abilities.
Optional: ring your client during the day, AI after hours
- If this number is already answering, select Turn off / restore normal calls, then Edit setup. The form opens below the number list.
- Under When should the receptionist answer?, select AI answers after hours; ring my phone when open.
- Enter Your receiving phone: the client’s phone that should ring while the business is open. Use a different number from the Twilio business number. Choose a ring time of 10, 15, 20 or 30 seconds.
- Choose the Business timezone. Use where the business operates, even if the person answering lives elsewhere. For example, America/New York is Eastern time, America/Chicago is Central, America/Denver is Mountain and America/Los Angeles is Pacific. Choose America/Phoenix for an Arizona business that follows Phoenix time; it does not follow Denver’s daylight saving changes.
- For each day, check open and set Opens and Closes. Leave closed days unchecked. Match the business’s actual hours; the initial Monday–Friday 9am–5pm entries are only a starting point. Review all seven days.
- Select Save changes (or Save receptionist for a new setup), then Turn receptionist on. Keep it on: the weekly schedule now chooses the flow automatically.
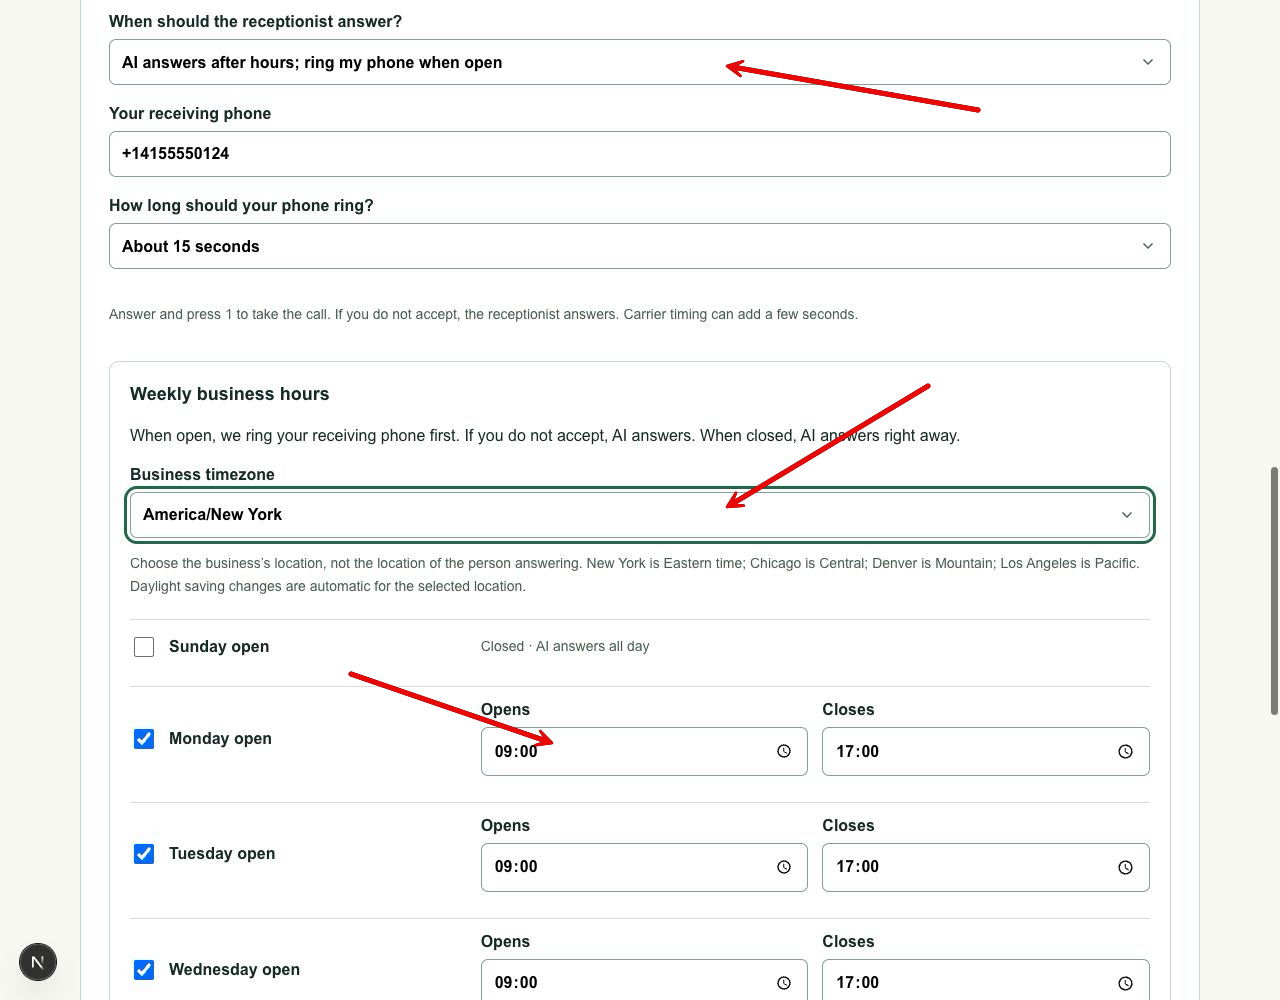
During open hours: the client’s phone rings first. They press 1 to take the call. If they do not answer or accept, AI answers. While closed: AI answers right away without ringing the client first. Example: Monday 9am–5pm means the phone rings first starting at 9:00am; calls at 5:00pm or later go straight to AI.
Times use the selected location’s local clock. Daylight saving changes are automatic. Each day supports one opening window. For an overnight shift, choose a closing time earlier than the opening time: Friday 10pm–2am stays open until Saturday 2am, even if Saturday’s own opening checkbox is off. Opening and closing times cannot be identical.
The schedule repeats weekly. Holiday closures and date-specific exceptions are not automatic. To change hours, turn answering off, edit and save, then turn it on again. Calls already underway keep their original flow; the schedule is checked when a new call arrives. When AI cannot connect, the existing saved fallback route still applies.
Test both flows: use a spare number. First set today’s hours to include the current business-local time and confirm the receiving phone rings. Leave it unanswered to check AI fallback. Then save a schedule that makes today closed and confirm AI answers immediately. Restore the intended hours afterward. Keep the receiving phone nearby so you can verify the first leg.
3. Turn on and make a test call
- Start with a number you control, preferably a spare number. It needs an existing incoming-call route we can save and restore.
- Under Your business numbers, select Turn receptionist on. This changes incoming voice calls for that number.
- Call it from another phone. Ask about a service, leave a fictional name and callback number, and confirm the details the receptionist reads back.
- For phone first, also test answering and pressing 1, and leaving it unanswered.
- Open Collected leads and select Refresh call details. Confirm the information is accurate before using this with customers.
To return to normal calls: select Turn off / restore normal calls. We restore the route saved when you turned it on, unless someone has since changed it in Twilio. Calls already underway can finish. If the AI connection fails, the call returns to the saved normal route; test that route too.
Keep browser receiving off for this number while the standalone receptionist is on. It uses a separate incoming route. If activation or restoration reports a problem, leave the page open, reload the current status and contact support.
4. Find and follow up on your leads
Select Collected leads to see the latest 100 calls. Search the details, mark a caller contacted, archive a call or download the displayed leads as a CSV file.
Reports can include the caller’s name, requested callback number, location, service request, timeframe, next step and summary. Missing fields stay empty. Partial or unconfirmed details need checking. A call taken on your own phone has no AI intake.
We save structured notes in this version, not a full recording or transcript. You can still view and download saved details and restore normal calls after the subscription ends.
Optional: keep your Make and Airtable workflow
In your existing Make scenario, add a Custom webhook to receive the processed call report. Copy its HTTPS address into your receptionist’s optional webhook box. Map the incoming lead fields to your existing Airtable or next steps.
This is a completed-call report, not a replacement for every module in your scenario. Your old unprocessed-lead webhook may expect different fields. Review the mapping before turning the scenario on.
{
  "schemaVersion": 1,
  "event": "receptionist.call_processed",
  "eventId": "unique-call-id",
  "call": {
    "id": "unique-call-id",
    "twilioCallSid": "Twilio-call-id",
    "businessName": "Example Drywall",
    "businessPhone": "+14155550123",
    "callerPhone": "+14155550124",
    "status": "completed",
    "detailsConfirmed": true,
    "startedAt": "2026-11-18T14:00:00.000Z"
  },
  "lead": {
    "customerName": "Example Customer",
    "callbackNumber": "+14155550124",
    "location": "Example City",
    "requestedWork": "Ceiling repair",
    "timeframe": "This month",
    "nextStep": "Business to call back",
    "summary": "Caller requested a ceiling repair estimate."
  }
}
Coming from the shared Rank & Rent Make example?
That example has a settings branch that looks up an asset by the number called, plus a final-report branch that writes Airtable and sends notifications. Lead to Crew handles the pre-call business settings itself; it does not call that old settings branch. Its optional webhook sends a completed report with event: receptionist.call_processed, not the old action: save payload.
- Create a separate Make Custom webhook for processed Lead to Crew reports, or add an explicitly filtered adapter branch to the existing scenario. Do not replace the website form webhook.
- Use
call.businessPhoneto find the matching Airtable asset and its linked client. Keep the client/asset record IDs inside your mapping. Our report does not provide the old scenario’sclient_idorcall_reference. - Map
lead.customerNameto the customer name,lead.callbackNumberto the callback phone, andlead.summary,lead.requestedWork,lead.location,lead.timeframeandlead.nextStepto your corresponding fields. Usecall.detailsConfirmedas confirmation status; we do not send the old qualified/outcome classification. - Store
eventIdas the duplicate-check key. If adapting an old branch that requires a call reference, map this ID explicitly and update that branch’s validation; it is not the old 64-character reference. Usecall.twilioCallSidwhen you need Twilio’s call ID. - After Airtable accepts the record, run your existing SMS/email notification branch once. Review existing Airtable automations too so both paths do not notify the same recipient twice. Use fictional test data and expected recipients first.
Leaving Make off is fully supported. Your collected leads still appear in Lead to Crew.
Avoid duplicate records: use eventId as a unique key. Check whether it already exists before creating another Airtable record. Automatic retries and Send copy again use the same eventId.
A successful delivery means your webhook accepted the request. It does not confirm every later Make module succeeded. Check your Make execution history too. We retry failed delivery up to six attempts. The lead remains here even if your app is unavailable. After fixing the connection, select Send copy again. Changing or removing the webhook pauses older queued copies; resending explicitly uses the current address.
Grok credits or connection warnings
If Grok explicitly rejects a request for credits or a spending limit, your dashboard shows a persistent warning. Other warnings distinguish key/permission problems, rate limits and unavailable connections. We do not display a remaining balance or warn that funds are “low”: this connection cannot read your Grok balance.
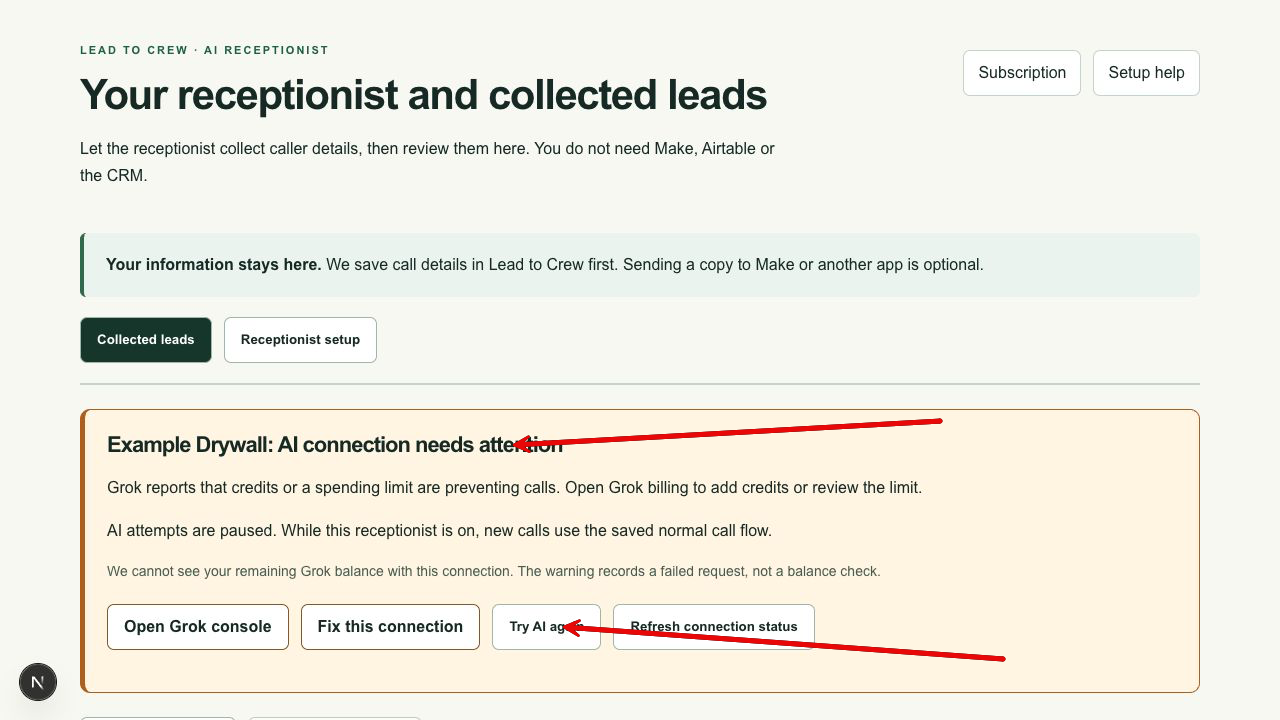
- While answering is on and AI is paused, new calls use the saved normal call flow. Existing call notes remain available.
- For a credits warning, open your Grok developer console’s billing area. Add credits or review your spending limit yourself. We do not enable auto top-up or change billing limits.
- For a key warning, check that the existing key is active and has the needed permissions. For a rate-limit warning, wait or review the limit. For an unavailable connection, check Grok service status and your connection; it may not be a billing problem.
- After fixing the issue, select Try AI again. This enables another attempt; it does not test the balance or prove the issue is fixed. Make a controlled incoming call.
- Select Refresh call details, Refresh connection status, or reload the page. The warning clears only after a new AI call begins producing audio. Another failure pauses AI again.
When AI setup times out, never repeatedly recreate the phone connection: Grok may have completed it before the timeout. Pending setup needs support review. Live recovery uses Twilio to return the original caller to the saved flow, including when the Grok session fails after connecting. It requires working Twilio call-update permissions and a reachable normal flow; it cannot reconnect a caller who has already hung up. If Twilio itself is unavailable, recovery may also fail. Test your fallback before relying on it. There are no automatic email/SMS credit alerts in this version.
Using a private trial or gift invitation
- Open the complete link shared with you. Create an account or sign in using the invited email address.
- Verify your email, then return to the invitation and select Activate AI Receptionist invitation.
- Complete the same Twilio, Grok and business setup described above.
A trial lasts 30 days from activation. No card is required and there is no automatic charge when it ends. Choose a paid plan yourself if you want to continue. An ongoing complimentary gift lasts until the person who issued it ends the access.
The link has a separate deadline to claim it. Reopening a used link does not restart or extend a trial. Invitations cover AI Receptionist only; Twilio and Grok still bill your own accounts for their services.
For the account owner: open Account → Receptionist gifts & trials. Enter the recipient’s email, choose a 30-day trial or ongoing gift, create the link, then copy and share it yourself. No invitation email is sent automatically. Ending a gift or trial does not cancel an existing paid subscription or stop provider charges.
Something did not connect?
No numbers? Confirm you connected the correct Twilio account and that its number supports voice. SIP trunk numbers are not supported by this setup.
Grok connection needs review? A timed-out setup may already have registered the number. Contact support rather than repeatedly trying to create it.
Caller details missing? Refresh after the call ends. An interrupted call may only have partial details. Make a controlled test and check the greeting and questions.
Subscription paused? Open Subscription to manage payment. Existing Voice and CRM subscriptions are separate.